mxGraph
mxGraph was one of the most popular diagramming libraries until it was officially declared end-of-life in 2020 by its original developer in a surprising move. Even though a fork has sprung up in its absence (maxGraph), it has been kept at pre-release versions (0.x.x) ever since 2020, so its API may prove less stable than the original library.
Migrating to JointJS offers a way out of this predicament. You can easily convert saved mxGraph diagrams into JointJS format and continue using them in a tool that is actively maintained.
Example
Let's say that your users have old mxGraph diagrams saved as XML, and they want to be able to import these files into an application, so that they can make changes to these diagrams visually:
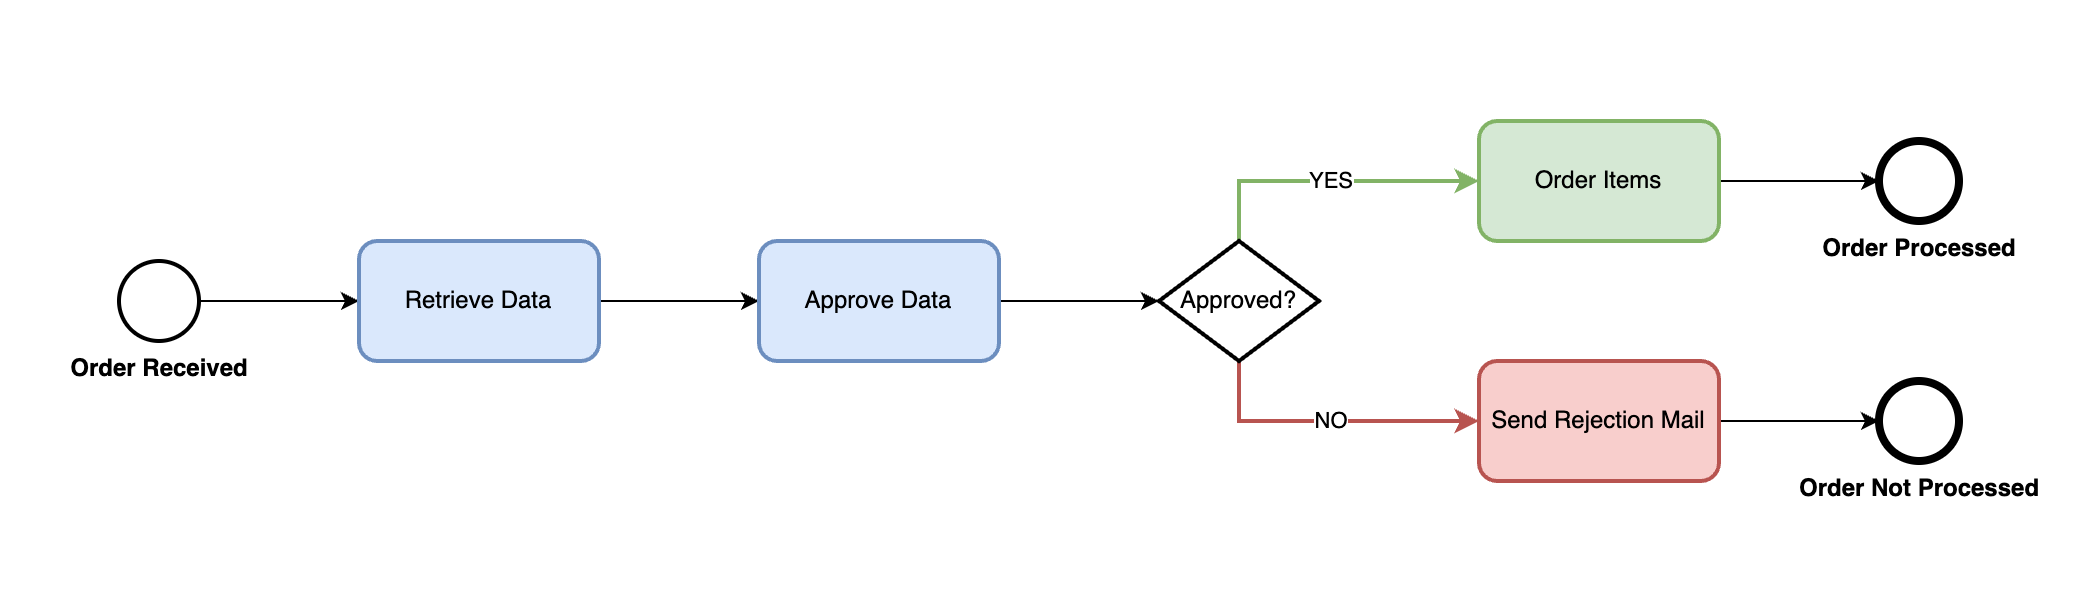
Have a look at the source XML here.
The interactive example below shows how the example XML can be parsed in order to create a JointJS diagram:
Now, let's have a closer look at the code that converts mxGraph's vertices and edges to JointJS's elements and links.
Basics
Here is the basic structure of our JointJS application:
// Parse XML and create JointJS cells from it
const doc = parseXML(xml);
const cells = createCells(doc);

// Create JointJS paper and graph
const paperContainer = document.getElementById('paper');
const graph = new dia.Graph({}, { cellNamespace: shapes });
const paper = new dia.Paper({
    model: graph,
    cellViewNamespace: shapes,
    width: 1040,
    height: 300,
    gridSize: 10,
    drawGrid: { name: 'mesh' },
    async: true,
    sorting: dia.Paper.sorting.APPROX,
    background: { color: '#F3F7F6' }
});
paperContainer.appendChild(paper.el);

// Populate the graph with created JointJS cells
graph.addCells(cells);
We first need to parse the mxGraph diagram XML as a Document object via the parseXML() function. Once we have the Document, we extract information from it via the createCells() function in order to create JointJS elements and links that match the mxGraph vertices and edges.
Finally, we need to define JointJS's graph and paper objects and add the paper to the 'paper' element in our HTML. We populate the graph with our converted data (cells), and we are done.
Let's look at each of these steps in more detail.
Parse XML
The parse method itself is very simple - we just need a Document element with the XML structure:
function parseXML(xml) {
    const parser = new DOMParser();
    return parser.parseFromString(xml, 'application/xml');
}
Create cells
The meat of our solution lies inside the createCells() function, which creates JointJS elements and links from mxGraph vertices and edges. To do that, we need to get to understand each mxCell in the parsed XML and determine whether it should be understood as an element, a link, or a link label (or neither of those, as is the case for various invisible control elements which can be ignored). We do this by checking whether our mxCell has vertex, edge and/or connectable attributes specified.
We also use this opportunity to parse the style attribute of the mxCell. Different properties inside style are separated by semicolons, and each property has a key and a value separated by the equals sign. The only exception to this rule is the shape property - in some mxGraph specifications (including the one followed by our example XML), the shape property does not have a key and always comes first in the style attribute, while its absence means that the mxCell is a rectangle. (In other specifications, the shape property is a standard property with a key and a value.)
Whenever there is a difference between how mxGraph encodes the shape type of an mxCell and how JointJS does it (e.g. a circle being encoded as an ellipse with a fixed aspect ratio in mxGraph vs. it being a separate built-in shape type in JointJS), these differences can be taken care of now, as well:
function createCells(doc) {
    const mxCells = Array.from(doc.documentElement.querySelectorAll('mxCell'));
    const cells = [];

    // Go through all mxCells, create elements and links
    mxCells.forEach((mxCell) => {
        const style = mxCell.getAttribute('style');
        if (!style) return;

        const styleStrings = style.split(';');
        let shape = '';
        const styles = {};
        for (const s of styleStrings) {
            const [key, value] = s.split('=');
            // Most items inside styles are key-value pairs
            styles[key] = value;
            // In the example XML, element shape is determined by the first item inside styles, which doesn't have `=`
            if ((value === undefined) && (shape === '')) shape = key;
            // If there is no such item inside styles, it means that the shape is a rectangle (see below)
            // Some mxGraph specifications enforce `'shape'` to be the key of this attribute - in that case you may use this instead:
            /* if (key === 'shape') shape = value; */
        }
        if (shape === '') shape = 'rectangle';
        // Circles in mxGraph are actually ellipses with a fixed aspect ratio
        if ((shape === 'ellipse') && (styles.aspect === 'fixed')) shape = 'circle';

        const isVertex = mxCell.getAttribute('vertex') === '1';
        const isLinkLabel = mxCell.getAttribute('connectable') === '0';
        const isElement = isVertex && !isLinkLabel;
        const isLink = mxCell.getAttribute('edge') === '1';
        if (isElement) {
            const element = createElement(mxCell, styles, shape);
            cells.push(element);
        } else if (isLink) {
            const link = createLink(mxCell, styles);
            cells.push(link);
        }
    });

    // Go through all mxCells again, add link labels to their links
    mxCells.forEach((mxCell) => {
        const isLinkLabel = mxCell.getAttribute('connectable') === '0';
        if (isLinkLabel) {
            createLinkLabel(mxCell, cells);
        }
    });

    return cells;
}
Based on the type of the mxCell, we choose to call either createElement(), createLink(), or createLinkLabel() function.
We will be using simplified logic for determining the properties of JointJS elements and links based on mxGraph mxCell objects since our example mxGraph diagram does not make use of all mxGraph style functionality. If you need to take additional properties into account, you can do so by tweaking the code inside the createElement() / createLink() / createLinkLabel() methods to populate additional presentation attributes.
Create element
If we need to create a JointJS element from the current mxCell object, we use a switch statement on the shape value to determine its type:
function createElement(mxCell, styles, shape) {
    switch(shape) {
        case 'circle': {
            return createCircleElement(mxCell, styles);
        }
        case 'rhombus': {
            return createRhombusElement(mxCell, styles);
        }
        case 'rectangle':
        default: {
            return createRectangleElement(mxCell, styles);
        }
    }
}
Our example XML only distinguishes between three basic shape types, which we can handle with built-in shape definitions from JointJS's standard library. We need to assign attributes to each created element:
- For the element
id, we can directly use theidattribute ofmxCell. - The
positionandsizeattributes can be taken from the attributes ofmxGeometry(a child ofmxCell). - Finally, the presentation attributes of each element (
attrs) can mostly be taken from thestyleattribute, but this is not a requirement - for example, the label text is taken directly from thevalueattribute ofmxCell. Indeed, you are free to specify additional presentation attributes as you need.
Let's use the createCircleElement() function as an example:
The other two functions look very similar, so we are not going to show them here, but you can find their code in the source code of the interactive example (Edit
button).
function createCircleElement(mxCell, styles) {
    return new shapes.standard.Circle({
        id: mxCell.getAttribute('id'),
        ...getGeometryAttributes(mxCell),
        attrs: {
            root: {
                magnetSelector: 'body'
            },
            body: {
                fill: styles.fillColor || '#ffffff',
                stroke: styles.strokeColor || '#000000',
                strokeWidth: styles.strokeWidth || 1
            },
            label: {
                text: mxCell.getAttribute('value') || '',
                fontFamily: 'Helvetica, sans-serif',
                fontSize: 12,
                fontWeight: (styles.fontStyle === '1') ? 'bold' : '',
                y: (styles.verticalLabelPosition === 'bottom') ? 'calc(h+10)' : 'calc(h/2)',
                textVerticalAnchor: styles.verticalAlign || 'middle'
            }
        }
    });
}

// ...see source code of the interactive example for `createRhombusElement()`

// ...see source code of the interactive example for `createRectangleElement()`

function getGeometryAttributes(mxCell) {
    const mxGeometry = mxCell.querySelector('mxGeometry');
    return {
        position: {
            x: parseInt(mxGeometry.getAttribute('x'), 10) || 0,
            y: parseInt(mxGeometry.getAttribute('y'), 10) || 0
        },
        size: {
            width: parseInt(mxGeometry.getAttribute('width'), 10),
            height: parseInt(mxGeometry.getAttribute('height'), 10)
        }
    };
}
Create link
On the other hand, if the current mxCell is supposed to become a JointJS link, determining its type is easy - in our example, all links are the same single lines. Therefore, we can map them all to the 'standard.Link' built-in shape type. (If your mxGraph XML diagram contains links of different types, you may write a switch statement with different link types instead, similar to what we did for elements). Similarly, you may need to change the router and connector if your mxGraph file uses different routing options.
The source and target attributes of the link are identified by id, and we can get those from attributes on the mxCell. Finally, we use this opportunity to translate mxGraph's entryX, entryY, exitX and exitY style properties into JointJS anchor function arguments.
function createLink(mxCell, styles) {
    return new shapes.standard.Link({
        id: mxCell.getAttribute('id'),
        source: {
            id: mxCell.getAttribute('source'),
            anchor: {
                name: 'topLeft',
                args: {
                    dx: toPercentage(styles.exitX),
                    dy: toPercentage(styles.exitY)
                }
            }
        },
        target: {
            id: mxCell.getAttribute('target'),
            anchor: {
                name: 'topLeft',
                args: {
                    dx: toPercentage(styles.entryX),
                    dy: toPercentage(styles.entryY)
                }
            }
        },
        // Change router name if `styles.edgeStyle` in your xml is variable
        router: { name: 'rightAngle' },
        // Change connector cornerType if `styles.rounded` in your xml is variable
        /*connector: { name: 'straight', args: { cornerType: 'point' }},*/
        attrs: {
            line: {
                stroke: styles.strokeColor || '#000000',
                strokeWidth: styles.strokeWidth || 1
            }
        }
    });
}

function toPercentage(value) {
    return `${(value || 0.5) * 100}%`;
}
Create link label
While mxGraph treats link labels as elements in their own right, JointJS treats them as properties belonging to a link. Therefore, whenever we encounter an mxCell that identifies a link label, we need to find the link in question and add the label's text value to it.
JointJS cannot assign a link label to a link it doesn't know about. In our example, we resolve this problem by making two passes through mxCells - one to collect all elements and links into the cells object, and second to add link labels to links.
function createLinkLabel(mxCell, cells) {
    const parent = mxCell.getAttribute('parent');
    const value = mxCell.getAttribute('value');
    const link = cells.find((cell) => (cell.id === parent));
    link.appendLabel({
        attrs: {
            text: {
                text: value,
                fontFamily: 'Helvetica, sans-serif',
                fontSize: 12,
                fontWeight: 'normal'
            }
        }
    });
}
Advanced example
We can make our application even better by applying JointJS+ functionality.
In this example, we are using PaperScroller to provide zooming and scrolling, Inspector to allow user modifications of diagram cells, and Toolbar to show buttons to export to SVG and JSON formats: